
Email encryption
appropriately. In addition, when exchanging personal data, there must be a legal basis for sending it.
For recipients outside of SDU, there are different solutions depending on the recipient’s email address. By using SDU’s secure post Outlook plugin Send Digital, it is possible to check in advance whether an email will be sent securely.
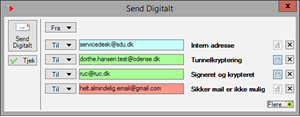
The four types of recipient addresses are reviewed below.
If the recipient is not covered by one of the options below, you are generally not permitted to send sensitive information via email. Contact your local IT department, who may be able to help you find another solution.
Ordinary email
If you send an ordinary email, for example, from Outlook, by pressing the ordinary Send button, it is not necessarily encrypted and thus may not be secure. However, see the section on Tunnel mail further below.
Internal SDU addresses (Internal address)
However, as an exception to the above, emails are sent internally at SDU to both employees and students. These are always considered as being sent securely, as the email does not leave SDU’s mail servers.
Tunnel mail (encrypted tunnel)
SDU and many public authorities, companies, etc. are part of the Danish Tunnel mail collaboration. If the recipient is part of the collaboration, you can send securely and directly from your own SDU mailbox to the recipient (and all other recipients who have the same domain name following the @ in their email address).
If you send to recipients in the Tunnel mail collaboration, the mail is always automatically encrypted even if you don’t use the Outlook plugin. However, you should use it to make sure the recipient is still in the collaboration.
Secure mail mailbox (Signed and encrypted)
SDU has several functional mailboxes that are set up to send and receive secure emails via state-issued certificates. This will typically be a mailbox used by a department or project to exchange secure email. If you need to send or receive a single secure email, you can ask your department whether they have the option, or contact sdu@sdu.dk and they can forward the email via secure mail.
It is possible to send emails from one of our secure functional mailboxes to a secure mailbox outside SDU. This will often also be a functional mailbox, such as ruc@ruc.dk, but can also be individuals in other organisations.
Note when using secure mailboxes:
• The subject line of the email is not encrypted and therefore must not contain sensitive information.
• The sender of the emails is not your personal mailbox but the functional mailbox. It will thus also be the functional mailbox that receives any reply.
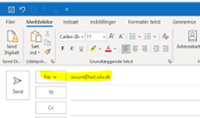
• Remember to change the sender address to the secure mailbox you want to send from before pressing the Send Digital button:
Digital Post/NgDP (formerly known as E-boks)
Citizens and companies can send emails directly to their public Digital Post mailbox via their CPR or CVR number, respectively. Not all employees at SDU can utilise this option.
If your department needs this option and does not already have it, your department can contact SDU IT – Servicedesk and we can make further arrangements. Your head of division and subsequently SDU IT’s head of division must give their approval before we can start setting this up.
In the example reviewed here, we are sending an email to an authority that has a contact hierarchy set up. If you are sending an email to private individuals or companies, the option to select a recipient contact point will not be relevant, and you can simply skip that step. The rest of the process is the same.
How to send a Digital Post message:
• Start a new email, and change the ‘From’ field to the shared mailbox you have access to that is set up for Digital Post and enter your CPR or CVR number in the ‘To’ field:
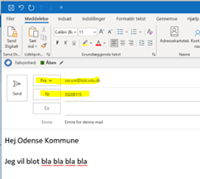
!! It is important to change the ‘From’ field, as any replies to your Digital Post will otherwise end up in SDU’s general mailbox, and it can be difficult for them to find the right recipient for the reply.
• You may want to remove the image from your email signature before sending, as linked images are not supported in Digital Post and it will therefore look best if it is not attempted to link it.
• Then press the ‘Send Digital’ button (this requires the plugin to have been installed in Outlook. If you need to install it, close Outlook and follow the installation instructions later in this document)
• This opens the ‘Send Digital’ window and the ‘NgDP Sender’ window:

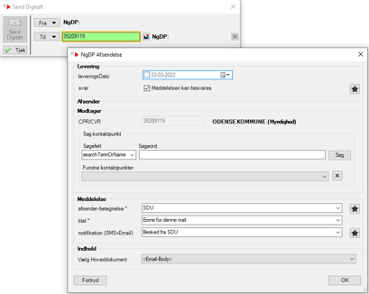
- ´*´ Used to save a selection as your default choice in that setting.
- ‘Message can reply’ is used to give the recipient the option to reply to the message.
- The ‘Sender’ segment is empty, as it is controlled by the shared mailbox you have selected.
- In the ‘Recipient’ segment, using ‘Search’ you can look for contact points at an authority. Then in ‘Found contact points’ you can choose which one you want to send to, so you don’t just send to their general mailbox. For example:
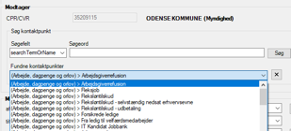
The ‘Recipient’ section can be ignored if sending an email to private individuals or companies without a contact hierarchy.
- ‘sender designation’ is the name displayed with us as the sender.
- ‘title’ is the title of the message. It is taken from the email, but can be changed here if needed.
- ‘notification (SMS+Email)’ is the message received by email and SMS that a person has received Digital Post.
Do not enter anything sensitive in this field, as it will be sent via ordinary email and SMS to the recipient.
- In ‘Select Main Document’ you can choose which document will be the first document the recipient sees. The other documents are displayed as secondary documents.
- When all of the above is filled in as requested, press ‘OK’
- In the ‘Send Digital’ window, you can now press ‘Send Digital’ if you are satisfied and want to send the message. Otherwise press the cross in the top right corner to cancel or the small icon to bring up the NgDP sender window again.
• If you need to familiarise yourself with the sending option before using it to send to external recipients, you can send a few test messages to your own CPR number before sending to an external recipient.
• As the main document is supported only by PDF, TXT or HTML, most mail clients are set to use HTML as the default mail format.
• As other attachments, the following types are supported:
- Image files: .bmp, .gif, .jpg, .png, .tif
- Documents: .pdf, .doc, .docx, .htm, .html, .odt, .rtf, .txt
- Spreadsheets: .xlsx, .ods
• Also note that in relation to GDPR processing, if you have sent an email to a CPR number, it is contained in the .XML attachment in the sent mail, so remember to process it.
Other recipients (Secure mail is not possible)
If the recipient is not covered by one of the above options, you are generally not permitted to send sensitive information via email. This could be a prospective international student.
Contact SDU IT – Servicedesk, who may be able to help you find another solution.
Please note that an email where the sender (e.g. an international student) has written sensitive personal information may only be answered by email if you delete the sensitive parts.
Note
The subject field
The subject field is not encrypted when sending via a secure mailbox/E-boks.
Therefore, the subject field must not contain sensitive data.
Send Digital button vs. recipients who can’t receive secure email
The Send Digital button does not send emails to recipients who cannot receive them securely. If you have multiple recipients – see also the next point – the button still works, but only sends emails to those who can receive them securely.
Multiple recipients in different categories
If you send with the Send Digital button with recipients in different categories, such as the following, be aware that the email will be sent out in several batches. It’s often best to explicitly send the email in several rounds so that you are sure of what is happening.
- Internal + Tunnel mail (internal address + tunnel encryption): Sent with your own email address as sender
- Secure mailboxes (Signed + encrypted): Sent with secure mail with the functional mailbox as the sender.
- The email is not sent to recipients who cannot receive it securely (even if they are on the recipient list).
• Modtagelse af krypteret e-mail kan ske på to måder
Tunnel mail
If you receive an email that has been sent as a tunnel email, you probably won’t even notice it, as the encryption is invisible to the user.
Secure email mailbox
An email from outside received securely to an SDU secure mailbox will have the following:
- The subject field contains the tag corresponding to the mailbox. This means that any reply will automatically use the same mailbox for its signature (not encryption). You still need the Outlook plugin to send encrypted emails from the mailbox.
- The email contains an attachment Security Marking.txt with information about the certificates used for sending, as well as the time of checking the validity of the certificate, etc.
Installation guide
Before you get started, please close Outlook. It can be reopened after the installation is complete.
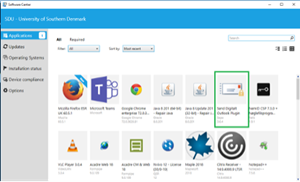
To install the Send Digital Outlook plugin, find the application (shown in green) in the Software Center on your computer as shown below and click on it:
Then select Install, as shown in this image:
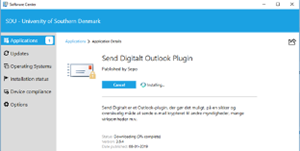
Wait a moment while the software is installed:
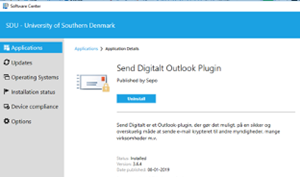
When the Uninstall button appears, as shown below, the Send Digital Outlook Plugin is installed. You can then close the Software Center.
Using the plugin to send encrypted mail
After installing the plugin, a Send Digital icon appears in the top right corner of the Outlook new/reply/forwarded email window. The button can be used to send secure emails:
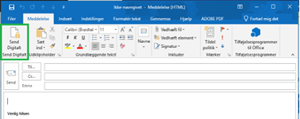
In normal use of the Send Digital Outlook Plugin, you start by entering the recipient(s), subject and content as usual and then finish by pressing Send Digital instead of the Send button.
In the Send Digital window that appears, you can then verify that the recipients can receive emails securely. It is possible to add multiple recipients of the secure email. If there are no more empty ‘To’ fields, you can bring up more by repeatedly pressing the More... button at the bottom right of the window.
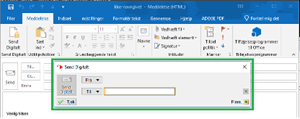
Once you have verified that the email can be sent securely to all recipients, you can send it by clicking the Send Digital button in the small window.
Sidst opdateret: 26.06.2023